
You’ve eaten them since you were little. Your kids eat them NONSTOP and you’re reeeeeeally bored with them (and wish these small humans could appreciate your extra sharp cheddar instead of their plastic square cheese). But I promise… this is not THAT Grilled Cheese. Stick with me, kid.
THIS Grilled Cheese is ooey and gooey and ACTUALLY TASTES LIKE HEAVEN. Seriously. But first, we have to address a few problems.
- The Elephant in the Room (its name is American Cheese). American cheese is not really cheese, so should it take center stage? I know, I know. It’s what you (and I) have eaten for our whole entire lives and it makes the grilled cheese you grew up with and it’s creamy and melty and yada yada yada. We can do better. American cheese is Cheddar in sheep’s clothing. It’s wannabe Cheddar. It WISHES it could be Cheddar, but instead, it’s just… the nap of the cheese world.
- Cheese and its baggage. Cheddar, Swiss and their other cheesy friends can often get oily when they melt. This is true- but help is on the way!
- BREAD (this one is more important than you think). Grilled Cheese on whole-wheat-sticks-and-stones bread, while tasty, does NOT hit that childhood Happy Place you’re looking for in the first place when you eat a Grilled Cheese, and your kids will fight you on it, too, because it doesn’t “look” right. I maintain that sticky-teeth-white-bread is actually the correct bread for this application- but you can’t mistreat it. No shoving it around a poorly heated skillet with a turner that can’t get under it. More on that later. You CAN use “grown-up” white bread here (sourdough, country, etc.), but if you’re going to do that, you’re probably making another kind of sandwich altogether, if we’re honest.
- Additives. I say that any additive has to ENHANCE the cheese, not cover it up. Bacon, while delicious and perfectly suited for a Grilled Bacon and Cheese or BLT, is NOT going to end up on this sammich. Sorry, not sorry. Instead, we’re going to use Dijon Mustard (pay attention- this is NOT the same as Spicy Brown or Deli Mustard). Hey- don’t make that face! You won’t be able to pick out the flavor of mustard, and neither will your kids. But the mustard will actually act as an emulsifier to keep your cheese from being oily in the finished product. And, since we’re using a sharp and delicious cheese, the mustard will act to accentuate that sharpness and make you sorry you didn’t do this before.
- Fat. It’s what gives us a roasty toasty exterior with potential for maximum crunch. And… This is the last place we will steer off of the well-established Grilled Cheese path. I know your grandma used butter, and your mom used margarine, and your weird neighbor growing up used oil, but go with me here. The subtle flavor of butter, while fine for American cheese, gets lost when posted up against Cheddar. Mayonnaise, specifically Duke’s Mayonnaise (the only brand I can find with no added sugar – seriously, America, do we have to add sugar to EVERYTHING??) will give you a perfect dose of flavor, along with the kind of bite that will have your family calling you a Crunchasaurus in no time. Also, mayo is smooth and won’t tear up your delicate bread the way butter can.
- Time. One Grilled Cheese at a time in a pan on a stovetop for a family of six makes my eye twitch. Someone is getting soggy bread that way. Nope. We’re going to do this, all at once, in mere minutes.
Now, let’s get to it. In terms of equipment, you will need (links provided in case you need any of these things, and Amazon is speedy-quick so a quick order and you’re ready for Meatless Monday): an oven, a sheet pan, parchment paper sheets (I prefer sheets to the roll kind because sheets don’t roll up and create a game of tag in your kitchen), a butter knife, a sturdy turner (I like a metal one), a Microplane Grater (yes, they’re really better- no one wants shredded knuckles from your old dull grater, and these give you smooth and easy shredding for decades). These are all things you’ll use ALL THE TIME once you have them. Trust me, they’ll make your life easier, and not just for Grilled Cheese.
Ingredients for four sandwiches:
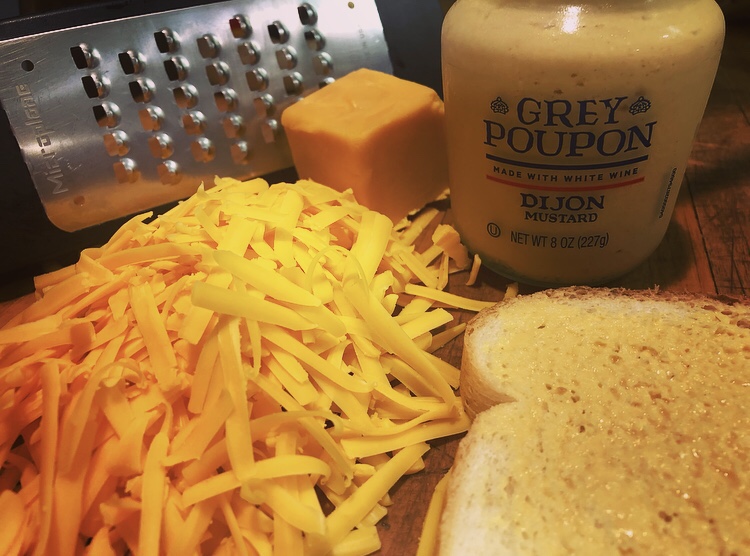
- Duke’s Mayonnaise- about 1T per sandwich, so 4T
- Dijon Mustard- about 1/2 t per sandwich, so 2 t
- 1 16 oz. block Extra Sharp Cheddar Cheese
- 8 slices white sandwich bread
Let’s get ready- in a professional kitchen, we call this mise en place– it means “everything in its place”– and it’s the real-deal secret to a successful meal of any kind.
- First, preheat your oven to 425. Don’t worry- it’s not too hot. It IS important to do this at the beginning, though, if you’d like to be the aforementioned Crunchasaurus.
- Line your sheet pan with a sheet of parchment paper.
- Grate enough Extra Sharp Cheddar Cheese so that each sandwich will end up with 1/2 cup, loosely packed. I know that sounds crazy- but it’s Cheddar- no need to be stingy. You do actually want to grate the cheese, rather than using slices. It has to do with the humidity of the cheese, but just trust me. Also, you need to do it yourself- don’t use cheese out of a bag. The stuff in a bag is coated with cellulose, which is actually intended to keep your cheese from sticking together. The concept of a melt is we want everyone in this pool together- so grate it yourself.
- Stage up your bread on your sheet pan so that you’re sure you have enough. A sheet pan will fit up to eight sandwiches. If you are making one, or three, or five, it doesn’t matter. Still use the sheet pan.
- Get out your Duke’s Mayonnaise and your Dijon Mustard, and your butter knife while you’re at it.
Sammich Prep:
- Spread a very thin layer of Dijon Mustard on the “inside” of each slice of bread. That means this sammich will have mustard above and below the cheese. Remember- this will help your cheese be creamy and magical.
- Pile about 1/2 cup cheese on top of the mustard on the “bottom” bread slices. Top with the other slice, mustard-side down.
- Spread the outside of the sandwiches (where your grandma used to put the butter) with Duke’s Mayonnaise. Don’t be shy, but don’t slather it. You want a nice, even layer, all the way out to the edges. #Crunchasaurus
- Line up your sandwiches in your pan as you make them, and place them into your fully-heated 425 degree oven. Set your timer for 7 minutes and walk away. No peeking- you’ll steal the heat from your Grilled Cheeses and this will take longer.

- When your timer goes off, flip your Grilled Cheeses with your sturdy turner. Set the oven for 6 more minutes.
- Flip your Grilled Cheese one last time and leave it in for one minute. Your oven may or may not have an attitude, and you may or may not need this last minute. I find that I do- but I also like a perfect, even, extra golden crunchtastic exterior on both sides. Because I am, in fact, the Original Crunchasaurus.
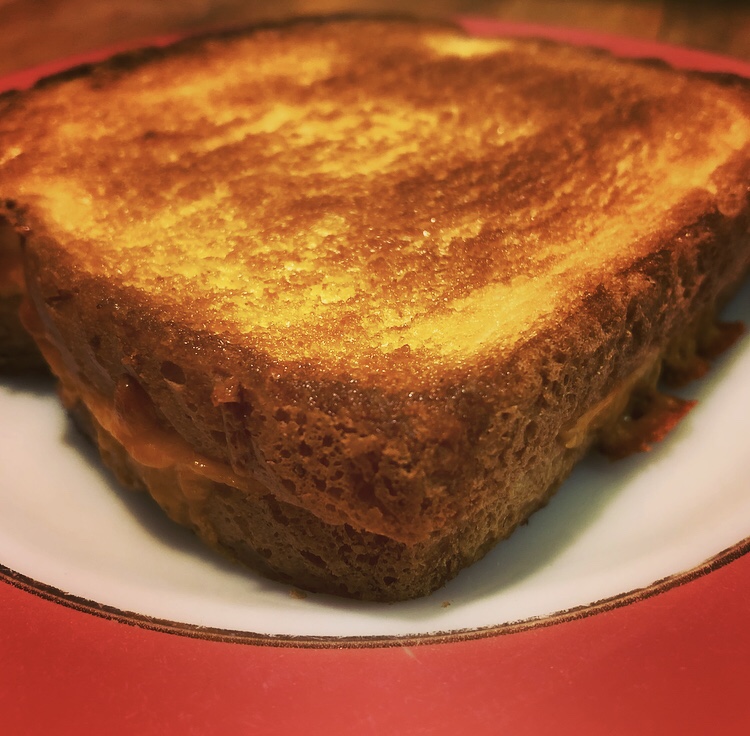
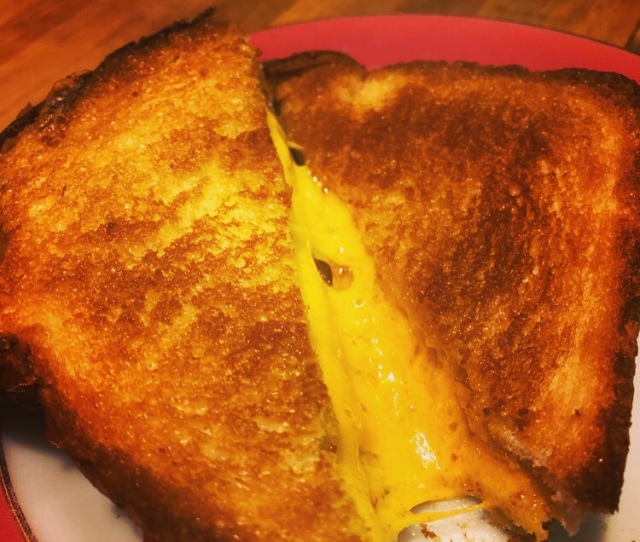
Let your Grilled Cheeses cool for just a few before you cut into them- they’ll be extra ooey and gooey and that Cheddar can be like molten lava at first.
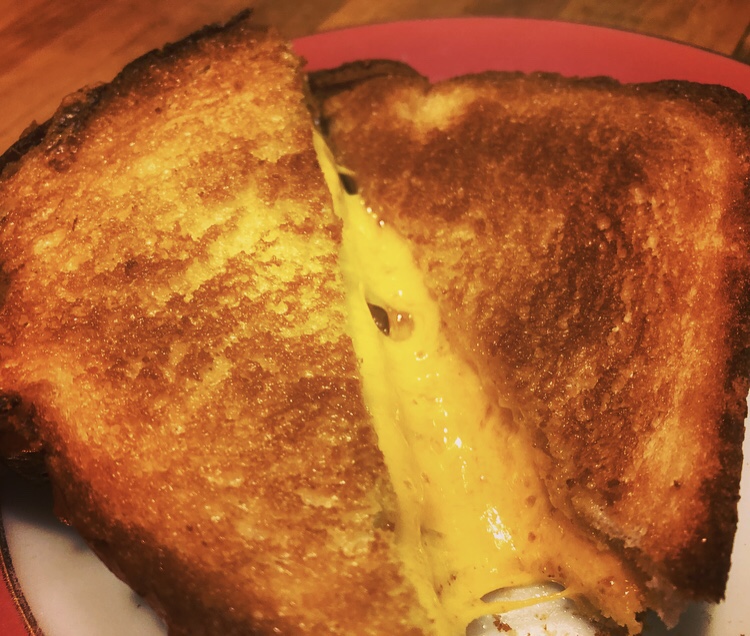
I know it’s not what you think you need when you make a Grilled Cheese. I know it sounds crazy- mustard? and mayo? and cheddar? But trust me. You won’t be sad the next time your kids demand Grilled Cheese. And maybe someday, you’ll try it exactly the same way, with Baby Swiss (swoon)! It’s just a cheese sandwich, after all… or is it?
Let me know how you like it in the comments, and don’t forget to subscribe!

Wow! I have to try this. I’m a little scared of the mayo instead of butter, but I trust you! Thanks!
LikeLike
You’ll love it— I’m just sure of it! Be sure to let us know how it goes!
LikeLike
It sounds divine. I’m sure Jean Ambrose will make me one!😍
LikeLike
Yummy!
LikeLike
Sounds really good. Now to find the time. Keep the goodness ideas coming!
LikeLike
Thanks, John! You’ve got the time, I promise! 10 minute prep, then throw together a salad while they’re in the oven… easy peasy! You can do it!
LikeLike
That looks and sounds amazing! Please share your buffalo mac an cheese soon 👀🤤
LikeLike
mmm. . . it looks delicious. I really enjoyed reading this post, and definitely agree that American Cheese is the elephant in the room when it comes to grilled cheese sandwiches.
LikeLike
Yum! This looks DEE-LISH. I’ve bookmarked this page for the next time I’m making grilled cheese sandwiches.
In the meantime, excuse me while I wipe up the drool from my keyboard…
LikeLike
Drooling is *always* encouraged!
LikeLike